Introduction
Looking to create a magical, mess-free zone where your child can play, learn, and imagine to their heart’s content? A play kitchen corner might just be the parenting win you’re searching for. Whether you live in a cozy apartment or a roomy house, setting up a designated kitchen play area doesn’t require a lot of space—just a touch of creativity, the right setup, and a few helpful tools.
As a parent, you already know the importance of engaging your child’s imagination. But what if you could also teach them real-life skills, promote responsibility, and encourage independence… all through play? That’s where a thoughtfully designed play kitchen corner comes in.
And don’t worry—you don’t have to hunt down pieces from multiple places. Whether you're looking for a stylish play kitchen, age-appropriate accessories, or toy storage furniture, PlayKitchen.com.au has you covered with a curated selection that blends functionality with fun.
Step 1 – Choose the Right Spot in Your Home
The first thing you’ll need to decide is where your play kitchen will go. A well-chosen spot can make all the difference in how often your child engages with the space.
What to Consider
-
Visibility: Make sure the area is somewhere you can easily supervise but doesn’t interfere with busy household areas.
-
Lighting: Natural light makes play more inviting—choose a corner near a window if you can.
-
Noise Level: Some kids prefer quiet play; others like to pretend while chatting. Think about what suits your child best.
Best Rooms or Corners to Use
-
Living room corner: Great for multitasking while your child plays
-
Bedroom nook: Offers quiet, focused pretend sessions
-
Playroom setup: Ideal if you want a larger, more elaborate kitchen scene
Quiet vs. Social Space
Some parents like to set up the kitchen where their child can mimic real-life cooking (e.g., near the actual kitchen). Others prefer quieter spaces to let the child’s creativity blossom solo. Choose based on your family’s lifestyle and how your child likes to play.
Step 2 – Pick the Perfect Play Kitchen
Now comes the fun part—choosing the kitchen itself! The right play kitchen should be more than cute; it should fit your space, match your child’s age, and support safe, meaningful play.
Size Matters
Make sure to measure your available space before selecting a unit. You don’t want a gorgeous kitchen that turns into a tripping hazard in your hallway.
-
Compact kitchens work well in smaller rooms or apartments.
-
Deluxe kitchens are great for shared play areas or siblings.
Wooden vs. Plastic
-
Wooden play kitchens offer durability, a premium look, and eco-friendliness. They're also easier to customize or repaint later.
-
Plastic kitchens are lightweight, colorful, and often come with electronic features like sounds and lights.
Where to Find Safe and Stylish Kitchens
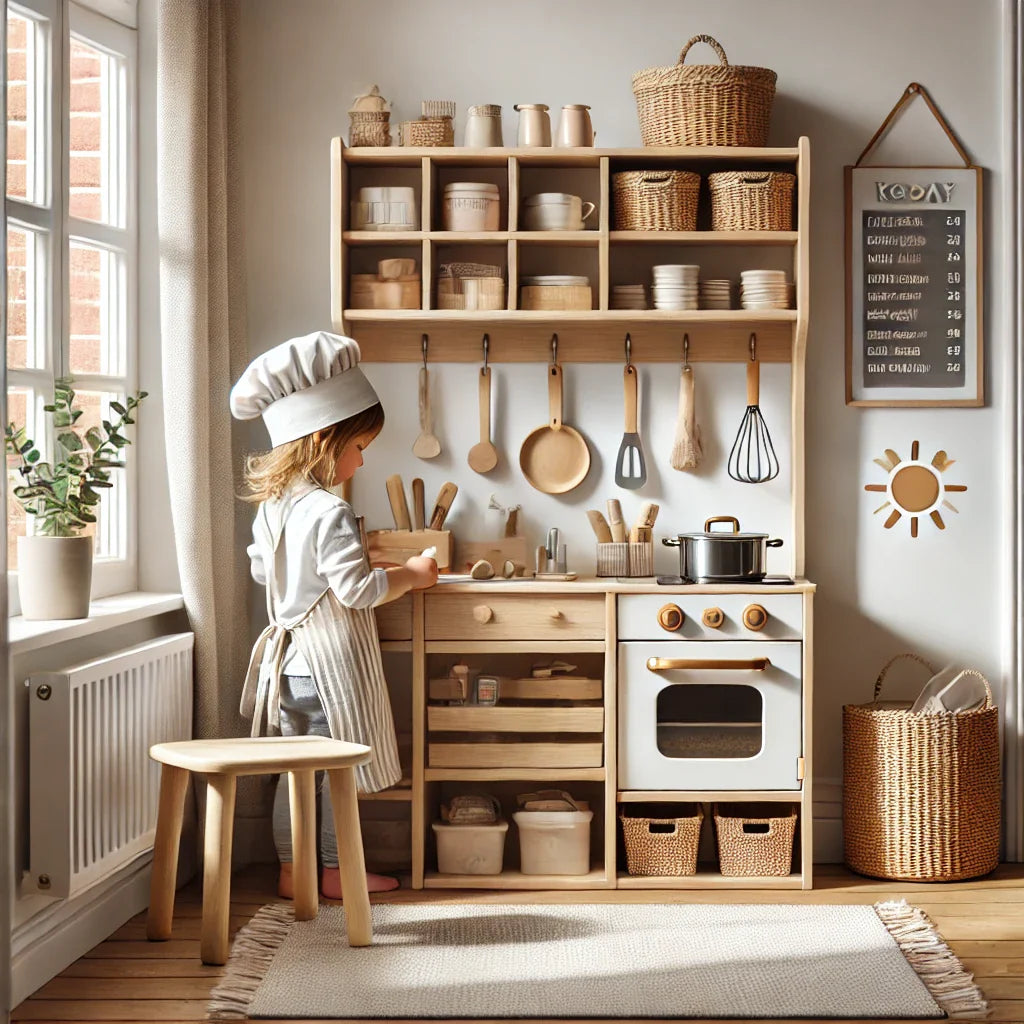
You can find a range of high-quality, age-appropriate designs at PlayKitchen.com.au. Their collection includes options for every space and budget, all designed with child-safe materials and thoughtful features like easy-to-turn knobs, open shelves, and realistic layouts.
Step 3 – Add Essential Accessories
A kitchen is just a box without the right tools to play with. Stocking it with fun and functional accessories brings the scene to life and keeps your child engaged longer.
Must-Have Accessories
-
Play food: Wooden fruits and veggies, felt sandwich kits, bakery items
-
Utensils: Pots, pans, spatulas, measuring cups
-
Appliances: Toy mixers, coffee makers, toasters
-
Dress-up: Chef hats, aprons, and mitts
These not only enhance realism but also introduce vocabulary and life skills.
Organize for Easy Play
Use small baskets or drawer dividers to group similar items together—this makes clean-up easier and helps your child develop sorting habits.
You can browse everything from full accessory bundles to unique add-ons in the accessories collection at PlayKitchen.com.au.
Step 4 – Smart Storage Solutions for the Play Area
We all know that with great pretend play comes great mess potential. That’s why smart storage is key to keeping the kitchen corner functional and frustration-free.
Toy Bins and Baskets
Choose bins that are:
-
Easy for kids to open and close
-
Clear or labeled for quick sorting
-
Durable enough for daily use
You can tuck them into open shelves or stack them beside the play kitchen.
Wall Storage
-
Use wall hooks for hanging utensils or mini aprons
-
Add a pegboard for extra storage without taking up floor space
Multi-Use Furniture
Consider adding a small piece of toy storage furniture that doubles as a pretend “pantry” or dining area. These space-saving units keep the area neat while adding to the play setup. Check out practical toy storage options tailored for small kitchens and playrooms.
Step 5 – Personalize the Space
Now that you’ve got the basics in place—kitchen, accessories, and storage—it’s time to make the play kitchen corner feel truly special. Personalizing the space gives your child a sense of ownership and encourages deeper, more imaginative play.
Add a Name Plate or Sign
Something as simple as a custom name sign like “Chef Ava’s Café” or “Noah’s Kitchen” can make your child feel proud and connected to their play area. You can DIY a name banner using cardboard and markers, or order a wooden cutout sign online.
Decorate with Pretend Menus and Labels
Give your child a few chalkboards, whiteboards, or printed menus. They can use them to:
-
List “daily specials”
-
Draw their favorite meals
-
Practice writing and spelling in a fun way
You can also print or draw labels for shelves and baskets. This helps with organization and introduces early reading skills.
Hang Aprons or Chef Costumes
Install a few adhesive wall hooks at child height and hang aprons, chef hats, or oven mitts. Dress-up play reinforces role identification and adds a sense of realism. It also helps your child switch “into character,” which boosts creative thinking.
DIY Additions to Elevate Play
Here are a few other ways to add magic to your kitchen corner:
-
A small dining table nearby for pretend serving
-
A flower vase or seasonal decor (mini pumpkins, holiday garlands)
-
A bell for “orders ready”
These small touches turn the play area into a mini-world where your child’s imagination can flourish.
Step 6 – Keep It Safe and Clean
Play kitchens might be pretend, but keeping them clean and safe is very real parenting work. Just like your actual kitchen, the pretend one benefits from regular care—especially if it's used daily.
Regular Cleaning Routine
-
Wipe surfaces weekly with a damp cloth (add mild soap for wood, disinfectant for plastic)
-
Clean play food items monthly—especially if your child shares them with friends or siblings
-
Check for wear and tear: loose screws, chipped edges, or fading labels can pose risks or dull the fun
Keeping the kitchen tidy also reinforces positive routines and responsibility. Invite your child to help clean up at the end of play, just like after a real meal.
Material-Specific Tips
-
Wooden kitchens: Use a damp microfiber cloth. Avoid soaking or harsh cleaners to preserve the paint and finish.
-
Plastic kitchens: These can typically handle mild disinfectant sprays. Be cautious around battery compartments in interactive features.
Safety First!
-
Remove or repair broken parts immediately
-
Avoid small accessories for children under 3
-
Make sure the kitchen is secure and stable, especially on hardwood or tile floors
Check for certified safety labels when purchasing play kitchens or accessories. Reputable brands often follow Australian toy safety standards (AS/NZS ISO 8124).
Step 7 – Rotate Toys and Keep It Fresh
Children thrive on variety. Rotating accessories and themes within the play kitchen corner keeps things exciting and encourages new storylines and learning opportunities.
Why Rotation Works
Rather than constantly buying new toys, rotate existing ones to:
-
Keep playtime fresh and engaging
-
Help your child discover “forgotten” toys
-
Encourage creative repurposing of familiar items
You can also rotate based on seasons or themes. For example:
-
Spring: gardening and fresh produce
-
Summer: BBQ set, smoothies, ice cream
-
Autumn: baking pies, harvest-themed items
-
Winter: hot drinks, holiday cookies
Simple Storage Strategies
Use a labeled storage bin system for rotating sets. Every couple of weeks, swap out what’s available:
-
Store toy food separately by food group
-
Rotate dishes, cutlery, and costume accessories
-
Introduce new recipes or challenges (e.g., make a rainbow meal)
You’ll be surprised how much longer your child engages with the same items, just because they feel “new” again.
Playdate Prep
Rotating items is also perfect for playdates. Plan themed play sessions with other kids and let them co-create restaurant menus, cafés, or food trucks. The social dynamic adds a fresh twist to the play kitchen experience.
Benefits of Having a Play Kitchen Corner
This isn’t just a fun hobby—setting up a play kitchen corner is an investment in your child’s development. Here’s what it offers beyond play:
Boosts Language and Communication Skills
Kids naturally start chatting when they pretend to cook, serve, and take orders. They pick up:
-
New vocabulary (kitchen tools, foods, actions)
-
Sentence structures (“Can I take your order?”)
-
Listening and responding skills
It’s a mini drama class + language lab rolled into one.
Builds Social and Emotional Intelligence
Role-play helps children understand different perspectives. They become:
-
Chefs serving meals to “customers”
-
Parents preparing food for “babies”
-
Hosts setting up “dinner parties”
This kind of emotional practice improves empathy, turn-taking, and problem-solving.
Develops Fine Motor and Organizational Skills
From placing food on plates to sorting items into shelves, pretend cooking hones fine motor precision and hand-eye coordination.
Tidying up afterward also teaches categorization, responsibility, and spatial planning—core skills for future learning.
Making It a Daily Routine
The best play setups become a natural part of daily life. Here’s how to encourage your child to use their play kitchen corner regularly.
Morning or Evening “Meal Prep” Time
Use pretend kitchen play to mirror real family routines:
-
Let your child make a “coffee” while you brew yours
-
Invite them to prep lunch for their dolls while you pack theirs
This sets up parallel play, which is comforting and teaches routine.
Themed Play Challenges
Add variety with fun prompts:
-
“Today’s challenge: Serve a 3-color meal”
-
“Can you open your own café today?”
-
“Make a birthday cake for Teddy”
Give your child a loose challenge and let them lead the play.
Involve Siblings and Friends
A play kitchen is perfect for shared imagination. It teaches cooperation and collaborative storytelling. One child can cook while the other plays customer or delivery driver.
If you're hosting a playdate, build it around a “restaurant day” or “market shopping” game and watch the creativity bloom.
Real-Life Inspiration: Parent-Approved Setups
Wondering what a beautifully set up play kitchen corner looks like in real homes? You’re not alone. Many parents share their imaginative setups online—and you can draw inspiration from their creativity to design a space that fits your home and child perfectly.
Instagram-Worthy Setups
Social media is full of dreamy kitchen corners featuring:
-
Neutral-toned wooden kitchens against white walls
-
Wall-mounted hooks with tiny aprons and kitchen mitts
-
Hanging pretend “menu boards” for daily specials
-
Little café signs made with chalkboard paint
Don’t worry—you don’t need a massive playroom to achieve the same charm. A small corner with thoughtful organization and personalized touches can be just as magical (and far more functional!).
Space-Saving Hacks That Work
Parents with small spaces have gotten creative:
-
Repurposing a bookshelf as a pantry
-
Using under-bed rolling bins for accessories
-
Mounting pegboards above the play kitchen for vertical storage
Sometimes, less really is more. Keeping things minimal reduces clutter and makes the area easier for toddlers to use independently.
Tips From Real Parents
-
“I switch out the play food every month to keep it interesting—my daughter gets so excited for the ‘new menu’.”
-
“We added a pretend cash register and turned the kitchen into a bakery café. Now my boys take orders and write receipts!”
-
“Instead of a table, I used a small kids’ bench as a serving counter—it doubles as seating too.”
The takeaway? There’s no perfect way to set up your space. The best kitchen corner is one that works for your child and your lifestyle.
Final Thoughts on Setting Up Your Kitchen Corner
Creating a play kitchen corner at home is about so much more than filling a corner with toys. You’re giving your child a space to grow, explore, and express themselves—one pretend meal at a time.
Let’s Recap the Key Steps:
-
Choose the right spot—near light, with good supervision
-
Pick a safe, age-appropriate kitchen—wooden or plastic, depending on your needs
-
Stock it with fun and functional accessories
-
Organize with smart storage—baskets, hooks, and labeled bins
-
Add personal touches to create a cozy, imaginative atmosphere
-
Keep it clean and safe for daily play
-
Rotate themes and toys to keep things fresh and exciting
The best part? You don’t need a massive space or a huge budget to set it all up. With a little creativity and a bit of guidance (which you now have!), you can build a space that supports imaginative play—and delivers priceless developmental benefits.
Whether you're starting small or going all-in, your play kitchen corner will soon become one of the most loved areas of your home.
FAQs
1. What age is best to introduce a play kitchen?
Most toddlers begin pretend play between 18 months and 2 years. At this age, a simple, safe play kitchen with large accessories is ideal. By age 3, kids can handle more detailed kitchens and complex play setups.
2. How much space do I need for a kitchen corner?
You can set up a kitchen corner in as little as 1 square meter. Compact kitchens fit snugly into bedroom corners, while larger ones need 1.5–2 meters of space. Vertical storage helps save space in tight areas.
3. What’s the best way to keep the area organized?
Use:
-
Labeled bins for play food and utensils
-
Wall hooks for aprons and oven mitts
-
Shelves or baskets for small items
Teach kids to clean up after play by turning it into a game—like “closing the restaurant.”
4. How do I make the kitchen corner educational?
Introduce learning through:
-
Menu-making for literacy
-
Food sorting by color or group for categorization
-
Counting meals served for math practice
-
Role-playing different community roles for social understanding
5. Are there gender-neutral kitchen sets available?
Yes! Many play kitchens now come in natural wood tones, pastels, or minimalist designs that suit all children. Avoid overly themed setups if you’re looking for a gender-neutral or versatile design.